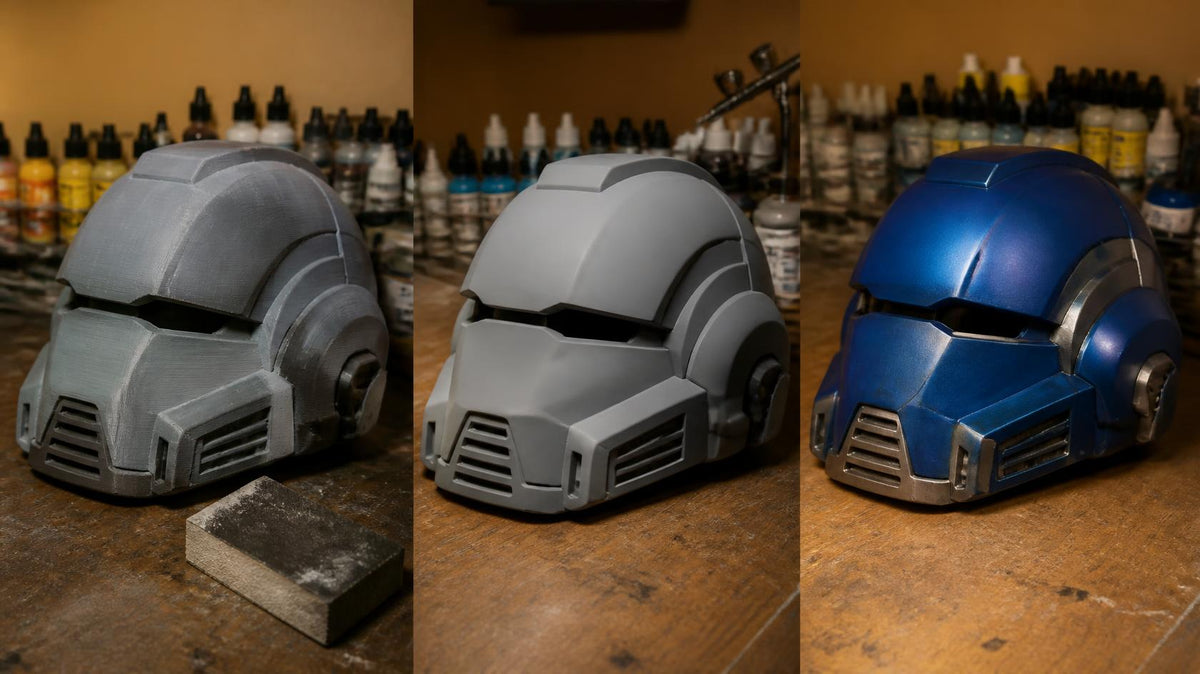
Painting a 3D print isn't much different from painting a miniature or a model kit, with one exception: the prep. A plastic kit comes out of the box smooth and clean. A print comes off the bed with layer lines, support marks and, in the case of resin, leftover chemicals. Deal with those first and the painting is the easy part.
We paint our own prints all the time, from small display pieces up to a life-size dragon, so this is the process we actually use.
Step 1: Prep Depends on the Print
FDM (filament) prints
- Remove supports and trim any stringing with a hobby knife.
- Sand the layer lines. Start coarse and work finer. A flexible sanding sponge follows curves far better than flat paper.
- Fill what sanding can't fix. A filler primer or a thin skim of modelling putty fills deeper lines and gaps.
- Wash off the dust and let it dry completely.
You can save a lot of sanding at the printing stage. Lower layer heights, printing curved surfaces at an angle, and good cooling all leave less to clean up.
Resin prints
- Wash thoroughly in isopropyl alcohol or a dedicated resin cleaner. Any uncured resin left on the surface will stop paint sticking.
- Remove supports while the print is still slightly soft, or carefully after curing.
- Cure fully under UV. A print that feels at all tacky isn't ready.
- Clean up support nubs with a knife and a fine sanding sponge.
Wear gloves when handling uncured resin, and work somewhere ventilated.
Step 2: Prime
Primer does three jobs. It gives paint something to grip, it shows up any flaws you missed, and it evens out the colour of the plastic underneath.
- Through an airbrush: the SMS Primer range sprays smooth and thin.
- From a can: Citadel Sprays like Chaos Black and Wraithbone are quick and easy for miniatures and smaller prints.
After the first coat, look closely under a strong light. Primer makes layer lines obvious. If you can still see them, sand again and re-prime. It's much easier to fix now than after paint.
Step 3: Paint
Once primed, a print paints just like anything else. Which paint you reach for depends on the job:
- Big, smooth surfaces such as props, helmets and display pieces suit an airbrush. Bifrost, our own airbrush paint made in Townsville, sprays straight from the bottle. Our airbrushing guide walks you through getting started.
- Miniatures and detailed prints paint beautifully with brush paints like Citadel. Our Citadel paints explained post covers which type to use when.
- Metallic and special finishes like chrome, pearl and colour-shift come from the SMS lacquer range.
Washes and drybrushing work especially well on textured prints like stone, rock and terrain, because they pick out detail and help hide any remaining layer lines.
Step 4: Seal It
Anything that gets handled should be varnished. A matt varnish protects the paint and hides any shine. Gloss suits cars, armour and anything that should look polished.
Common Problems
| Problem | Likely cause | Fix |
|---|---|---|
| Layer lines show through paint | Not enough sanding or filling | Sand back, fill, re-prime |
| Paint peels off a resin print | Uncured resin on the surface | Strip, rewash, cure fully, re-prime |
| Paint stays tacky | Resin not fully cured, or coats too thick | Cure longer, use thinner coats |
| Rough, grainy finish | Primer sprayed too far away or in humid air | Sand lightly, spray closer and thinner |
Want Us to Print It?
If you'd rather skip the printing and go straight to painting, upload a file through Rising Sun 3D and we'll print it for you. And if you've got a print you're not sure how to finish, bring it into the shop at 22 Castlemaine Street, Kirwan, and we'll talk you through it.